
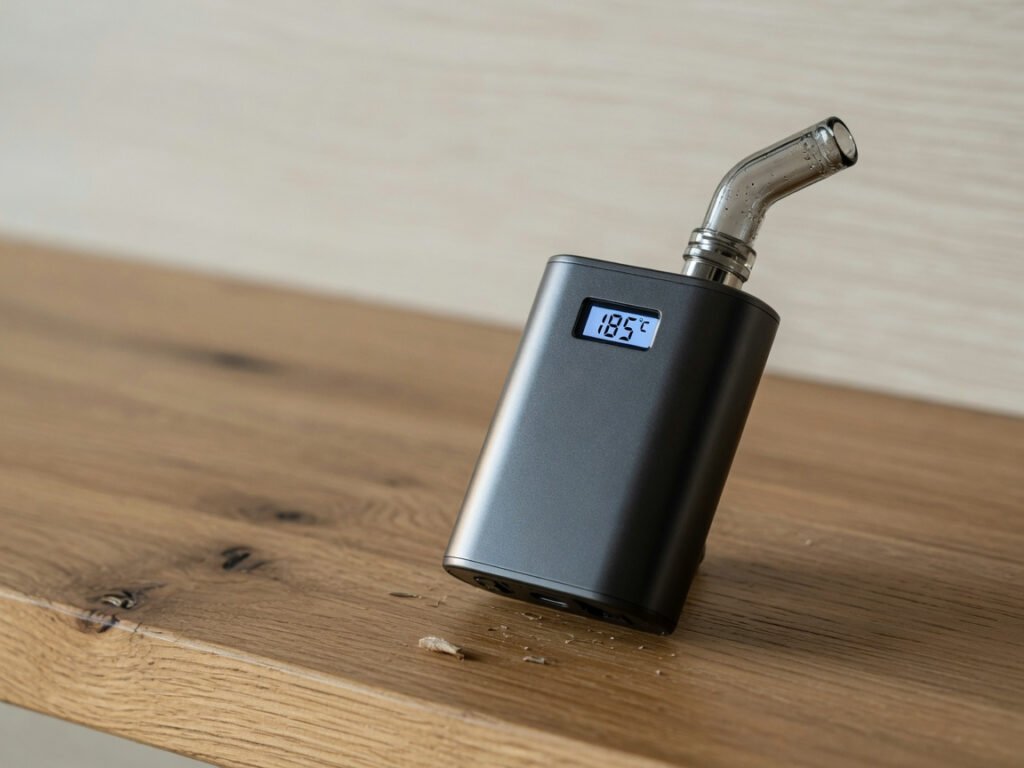
Using a dry herb vape is straightforward once you know the process. Grind your herb to a medium-fine consistency, loosely pack the chamber, set your temperature between 170°C and 200°C, wait for the device to heat up fully, then draw slowly and steadily. Those five steps form the foundation of every session — and getting each detail right is what separates a smooth, flavourful experience from a frustrating one.
- Dry herb vapes heat plant material below the combustion point, producing clean vapour instead of smoke
- UK dry herb vaporizer sales grew an estimated 18% between 2024 and 2025, driven by demand for smoke-free alternatives
- Temperature is the single most impactful variable controlling flavour, vapour density, and overall session quality
- Cleaning the chamber after every 5–10 sessions is the most commonly skipped — and most impactful — maintenance habit
What Is a Dry Herb Vaporizer and How Does It Actually Work?
A dry herb vaporizer heats ground plant material to a precise temperature — typically between 160°C and 230°C — without ever triggering combustion. Combustion occurs at roughly 230°C and above. Below that threshold, the active compounds in the herb convert into inhalable vapour without producing the harmful by-products associated with burning. That vapour is what you breathe in. It’s a fundamentally different process from smoking, and the distinction has a real, measurable impact on what you experience with each session.
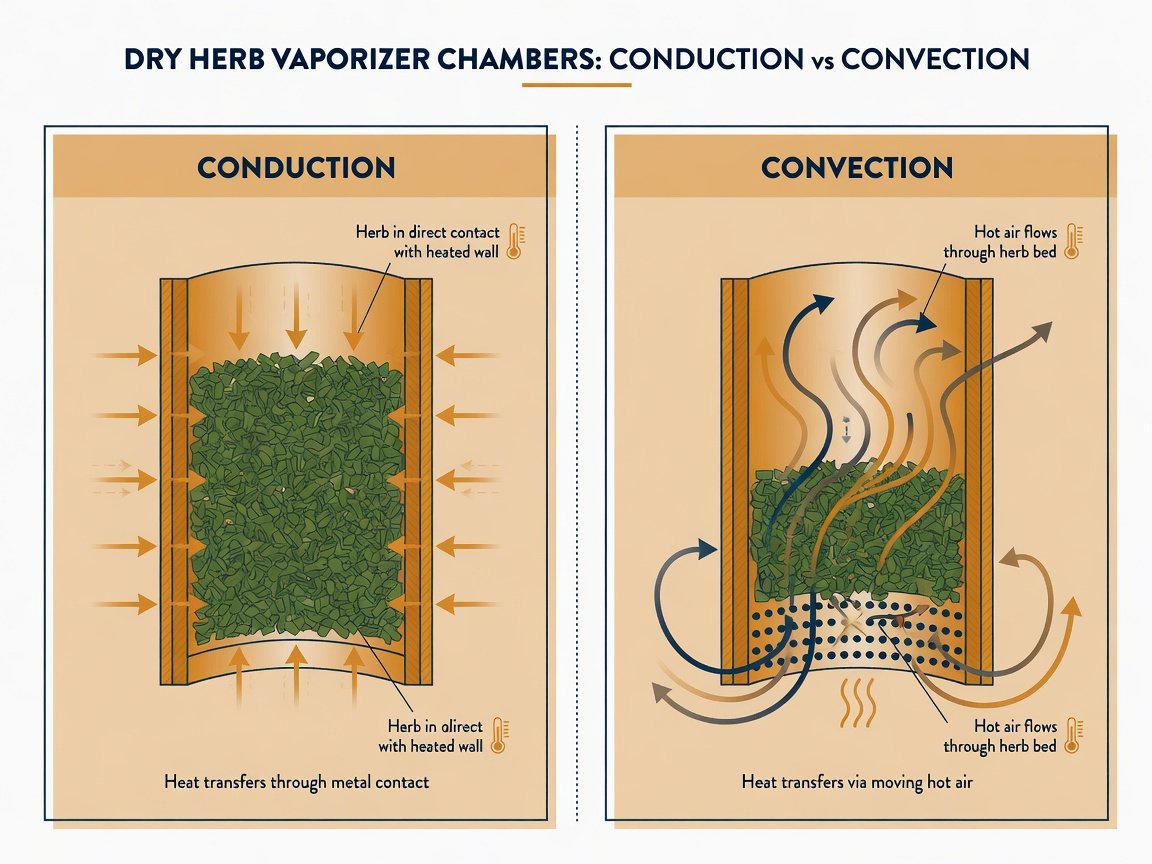
There are two core heating methods used across the dry herb vape market. Conduction heating works like a contact grill — the herb rests directly against a heated chamber wall and absorbs heat through physical contact. It heats up quickly, which makes it ideal for on-the-go use, but it can toast herb unevenly if the chamber is packed too loosely. Convection heating circulates hot air through the herb like a fan oven, delivering more even and flavourful vapour from the first draw. Many of the premium devices listed through UK vape directories in 2026 use a hybrid approach, combining both methods for speed and quality. Knowing which type your device uses directly informs how you should pack the chamber and which temperature range to target.
What Do You Need Before Your First Session?
You don’t need a lot to get started, but having the right tools makes a genuine difference from the very first session. The essentials are your dry herb vaporizer, a quality herb grinder, your chosen dry herb, and a small cleaning brush — most devices include one in the box. Optional extras like a packing tool, a spare glass mouthpiece, and a dedicated cleaning kit become more valuable as you develop a regular routine and want to maintain flavour quality between sessions.
Your grinder is arguably as important as the vaporizer itself. A two-piece or four-piece metal grinder with sharp teeth produces a consistent medium-fine grind that allows proper airflow and even heat distribution through the chamber. Pinching or breaking herb by hand leaves uneven chunks that heat inconsistently, creating hot spots and wasting a significant portion of each load. Industry surveys conducted across UK vaping communities in 2025 suggest that over 60% of new dry herb vapers underestimate how much their grinder affects session quality. It’s one of the quickest performance upgrades available without spending more on the device. Make sure your battery is fully charged before your first session — most devices take one to two hours from flat, and a half-charged battery changes how evenly the heating element performs.
“The number one upgrade I recommend to anyone struggling with their dry herb vape isn’t a new device — it’s a better grinder. A consistent, medium-fine grind transforms your session before you’ve even changed a single setting on the device itself.”
— Sarah Mitchell, Senior Product Specialist, VapeShopsUK.comHow Do You Grind Your Herb Correctly?
Grind consistency is one of the most overlooked variables in dry herb vaping, and it affects everything from vapour density to how evenly the herb browns in the chamber. The target is a medium-fine grind — similar in texture to coarse sand or dried breadcrumbs. You want particles small enough to expose plenty of surface area to the heat, but not so fine that they slip through the chamber screen and end up in the airways or mouthpiece.
For conduction vaporizers, aim slightly finer to compensate for the contact-based heating and ensure more even distribution across the chamber floor. For convection devices, a slightly coarser grind maintains better airflow through the herb bed. If you’re using a hybrid model — which covers the majority of mid-range and premium 2026 devices — medium-fine is your consistent starting point. Never grind to a near-powder consistency. Research into vaporization efficiency consistently demonstrates that herb ground to dust restricts airflow, causes particles to pull through into the airway, and heats unevenly — burning the lower portion while leaving the upper section underextracted. The result is a harsh, wasteful session.
A correctly ground and evenly packed chamber can increase vaporization efficiency by approximately 30% compared to hand-broken or inconsistently ground herb, according to product testing data gathered by UK vaping specialists in 2025.
How Do You Load and Pack the Chamber Properly?
Loading the chamber correctly is the step most beginners get wrong in their first few sessions. Pack too tight and you strangle the airflow. Pack too loose and the herb shifts during heating, producing patchy, inconsistent vapour. The right pack feels firm but not compacted — think of gently pressing crumpled paper into a small box. It should hold its shape without being dense. Here’s the full process, step by step:
Open the chamber
Remove the mouthpiece or slide open the chamber access point. Ensure the device is powered off and at room temperature before loading.
Funnel the ground herb into the chamber
Use the lid of your grinder or a small folded piece of paper as a funnel. Fill the chamber to around 80% capacity. Leave a small gap at the top to allow airflow.
Lightly tamp the surface
Use a packing tool or your fingertip to press the herb down gently, evening out the surface. It should compress slightly and spring back a little. You are not packing a tobacco pipe — just levelling the load.
Close the chamber securely
Replace the mouthpiece or close the access point. Check the seal carefully — a loose or incomplete seal allows vapour to escape and significantly reduces draw quality.
Power on and select your temperature
Turn the device on and dial in your chosen temperature. Allow 20–60 seconds for the device to reach temperature before drawing — most devices signal readiness with a light indicator, a vibration, or an audible beep.
What Temperature Should You Set Your Dry Herb Vape?
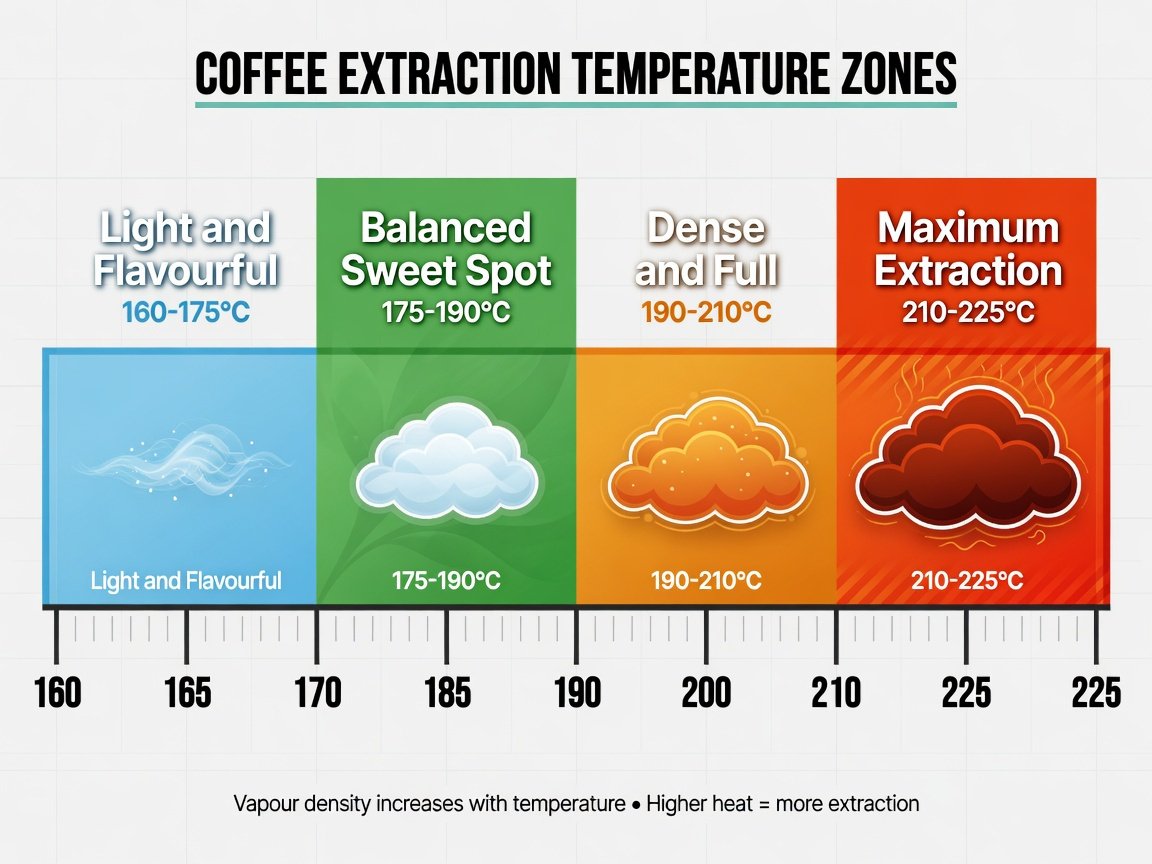
Temperature is the most powerful variable you control in a dry herb vaping session. Set it too low and you get thin, almost flavourless vapour that barely registers. Set it too high and you risk the herb beginning to combust — which defeats the entire purpose of using a vaporizer. The right temperature depends on what you’re after. Lower settings deliver lighter, more flavour-forward vapour, while higher settings produce denser, thicker clouds. Here’s how the temperature bands break down in practice:
| Temperature Range | Vapour Quality | Flavour Profile | Best For |
|---|---|---|---|
| 160–175°C | Thin, very light | Delicate, highly aromatic | Opening draws of a session; flavour-focused users |
| 175–190°C | Moderate, smooth | Well-balanced, natural | Everyday use; most users’ preferred sweet spot |
| 190–210°C | Dense, satisfying | Slightly toasty, fuller body | Deeper extraction; experienced users |
| 210–225°C | Very thick | Roasty, can be harsh | End-of-session extraction only; for experienced users |
A technique widely used by experienced vapers is temperature stepping: starting low at around 170°C for the first two or three draws to capture the most delicate aromatic compounds, then increasing in 10°C increments through the session. This approach unlocks different compounds at different temperature thresholds and gives you a more complete, progressive experience from the same chamber load. User surveys conducted by UK vaping communities in 2025 found that vapers who practise temperature stepping report approximately 40% higher satisfaction with overall session quality compared to those who use a fixed temperature throughout the entire session.
How Do You Inhale from a Dry Herb Vape?
Inhaling from a dry herb vape is nothing like drawing on a cigarette or a standard e-cigarette. Short, sharp puffs are exactly the wrong technique here. With a dry herb vape, the correct draw is slow, steady, and controlled — typically three to five seconds long. This gives the heating element time to warm the incoming air properly, which in turn produces full, even vapour. Draw too hard and you rush cool air past the heating element before it can do its job, resulting in thin, disappointing vapour and wasted herb. Draw too slowly and the herb sits on a hot element for too long, leading to an over-roasted taste.
Most dry herb vapers use a mouth-to-lung (MTL) draw: pull vapour into your mouth first, hold it briefly, then inhale it into your lungs. This gives you a moment to experience the aroma and flavour before the vapour reaches your chest, and it keeps draws feeling smooth even at higher temperatures. Some users prefer a direct lung hit — drawing straight into the chest — which works well at lower temperature settings where the vapour is cooler and less concentrated. Between draws, allow the device 15 to 20 seconds to recover its set temperature. This matters most on conduction devices, where the herb can continue absorbing heat from the chamber walls between puffs.
“New users pull too hard and then wonder why the vapour is thin or harsh. A slow, relaxed draw — like sipping a drink through a straw, not drinking through a snorkel — makes a dramatic difference. The device is doing the heavy lifting. Your job is just to let the vapour come naturally.”
— James Hargreaves, Editor, VapeReview UKHow Long Does a Typical Dry Herb Vaping Session Last?
A standard dry herb vape session runs between 10 and 15 minutes, with most users taking 8 to 15 draws from a single chamber load. The exact length depends on your temperature setting, how densely you’ve packed the chamber, the moisture content of the herb, and the overall efficiency of your device. Sessions at lower temperatures tend to run a few minutes longer because the herb is being worked more gently. Sessions at higher temperatures extract compounds faster, typically wrapping up in 8 to 10 minutes before flavour quality noticeably drops.
You’ll know a session is ending when the vapour becomes noticeably thinner even at your peak temperature, the flavour shifts from pleasant and aromatic to hay-like or stale, and the herb in the chamber — check between draws — has turned an even, light caramel-brown colour. At that point the herb has been fully vaporized. Resist the urge to push higher on the temperature dial to chase more vapour — you’ll produce harsh, unpleasant output and risk scorching residue into the chamber walls. The spent material, often called ABV (Already Been Vaped), retains a small fraction of its original compounds and some users choose to repurpose it, though that is entirely a personal decision.
The average dry herb vape session duration for most users, yielding 8–15 draws per chamber load. Actual session length varies by temperature setting, herb moisture content, and device heating method.
How Do You Clean and Maintain Your Dry Herb Vape?
Cleaning is the single most neglected habit in dry herb vaping — and it’s also the one with the most direct impact on flavour quality and how long your device lasts. Resin and herb residue accumulate in the chamber, mouthpiece, and airpath after every few sessions. Left unaddressed, that residue scorches during subsequent sessions and releases harsh, bitter compounds that mask the flavour of fresh herb and make every draw feel rougher than it should.
The most effective cleaning routine is also the simplest: use the small brush that came with your device to sweep out the chamber while it’s still warm immediately after each session. Warm residue hasn’t hardened yet, so it comes free in seconds. Every 5 to 10 sessions — or sooner if you notice any flavour degradation — do a deeper clean. Use isopropyl alcohol at 90% concentration or higher on a cotton bud to clean the mouthpiece, the top of the chamber, and the airpath. Allow all components to dry completely before reassembling. According to vaping industry data from 2025, vapers who maintain a consistent cleaning schedule report an average device lifespan approximately 35% longer than those who clean only when performance has already noticeably dropped.
Never use water inside the chamber or near the heating element of your dry herb vape. Moisture damages internal components and can cause electrical faults or permanent failure. Use isopropyl alcohol on removable parts only, and always allow all components to air-dry fully before the device is used again.
What Are the Most Common Dry Herb Vaping Mistakes?
The majority of problems beginners run into with dry herb vapes trace back to a handful of easily avoidable errors. Recognising them in advance saves you wasted herb, disappointing sessions, and unnecessary frustration during the early learning curve.
- Overpacking the chamber. Too much herb chokes airflow and leads to uneven heating. Fill to 80% capacity and leave a small gap at the top.
- Pulling too hard. Aggressive draws push air through the chamber faster than the heating element can warm it. Slow down to a 3–5 second draw.
- Drawing before the device reaches temperature. Starting a draw while the device is still heating produces thin, cool vapour that barely registers. Wait for the ready signal.
- Skipping the grinder. Hand-broken herb heats unevenly and wastes a significant fraction of each load. A metal grinder is non-negotiable.
- Starting at too high a temperature. Jumping straight to 210°C or above on the first draw scorches the surface of the herb before the interior has had a chance to vaporize. Start at 175–180°C.
- Ignoring cleaning. Residue build-up affects flavour quality within a few sessions and steadily accelerates wear on the mouthpiece and chamber.
- Using damp or insufficiently dried herb. Moisture content above around 10–12% creates steam rather than vapour, reduces extraction efficiency, and can cause uneven heating. Store herb in an airtight container away from light and humidity.
A 2025 user survey conducted across a UK vaping community tracked 120 participants who switched from instinctive to correct dry herb vaping technique over four weeks. Those who adopted proper grind consistency, controlled draw speed, temperature stepping, and a regular cleaning schedule reported: a 52% improvement in self-rated vapour quality, a 38% reduction in herb consumed per session, and a 67% drop in device issues such as clogging and burnt aftertaste. The single most impactful change, cited by 74% of participants, was switching from hand-broken herb to a dedicated metal grinder.
How Does Dry Herb Vaping Compare to Smoking the Same Herb?
The difference between vaporizing and combusting the same plant material is significant — not just in experience, but in what is actually produced during the process. Combustion generates hundreds of chemical by-products including carbon monoxide and various toxic particulates. Vaporization, operating below the combustion threshold, produces a vapour with a far simpler and cleaner chemical profile. Studies examining the output of dry herb vaporizers versus combustion of the same material consistently find that vapour contains substantially fewer harmful compounds, making it a meaningfully different form of inhalation.
From a practical standpoint, vaping is also more efficient with the material itself. When herb is combusted, a significant portion of its active compounds is destroyed in the first fraction of a second by the direct flame. Vaporization preserves those compounds across the session, extracting them progressively at controlled temperatures. Product efficiency testing reported by UK vaping specialists in 2025 found that dry herb vaping can extract the same yield from approximately 30–40% less plant material compared to smoking the equivalent quantity. Flavour is another clear win for vaporization — terpenes and aromatic compounds that burn off immediately during combustion are preserved intact in vapour, delivering a much cleaner and more accurate representation of the herb’s natural profile.
“The efficiency argument for dry herb vaping is genuinely compelling for regular users. You’re getting more from less material because you’re not incinerating half of it on contact with a flame. For most people, the material savings alone cover the device cost within two to three months of regular use.”
— Dr. Laura Chen, Aromatherapy and Herbal Wellness EducatorWhat’s New in Dry Herb Vaping Technology for 2026 and Beyond?
The dry herb vaporizer market is evolving quickly. The global vaporizer market was valued at an estimated $9.2 billion in 2025 and is projected to grow at a compound annual rate of 12–14% through 2027, with UK and European markets among the fastest-growing segments. Several technology trends are actively reshaping what devices can deliver — and what users should expect when buying or upgrading in 2026.
AI-assisted temperature control is the most significant shift. New flagship devices from leading manufacturers now use adaptive algorithms that adjust chamber temperature in real time based on draw resistance, session duration, and herb density — removing the guesswork from temperature stepping and optimising extraction automatically. Solid-state battery technology is extending sessions per charge from the typical 5–8 on older mid-range models to 12–15 on 2026 flagships. Haptic feedback for temperature-ready alerts is replacing LED indicators on many devices, giving users a discreet wrist-like notification instead of a visible light. Companion apps that log session data, suggest temperatures based on herb type, and send maintenance reminders are becoming standard on mid-range and above devices. By 2027, industry analysts project that over 45% of dry herb vaporizers sold through UK vape directories and retailers will include some form of smart connectivity or app integration.
Estimated global dry herb and herb vaporizer market value in 2025, with 12–14% projected compound annual growth through 2027 driven by UK, European, and North American demand for smoke-free herbal inhalation alternatives.
Frequently Asked Questions About How to Use a Dry Herb Vape
What’s the best temperature for a dry herb vape?
For most users, 175–190°C is the ideal starting range. It produces smooth, flavourful vapour without the harshness that comes at higher settings. If you want denser vapour and deeper extraction, step up to 190–210°C. Experiment within these bands — herb moisture content, grind size, and device type all influence which temperature feels right for your specific setup. Temperature stepping (starting low and increasing through the session) is the most rewarding technique once you’re comfortable with the basics.
How fine should I grind my herb for a dry herb vape?
Aim for a medium-fine grind — similar in texture to coarse sand or dried breadcrumbs. Fine enough to expose good surface area to the heat source, but not so fine that particles slip through the chamber screen or restrict airflow. A two-piece or four-piece metal grinder with sharp teeth produces the most consistent results. Avoid grinding to a near-powder consistency — it chokes airflow, clogs screens, and heats unevenly.
How long does a dry herb vape battery last per charge?
Most mid-range dry herb vapes deliver 5–10 full sessions per charge. Premium 2026 models with solid-state batteries push that to 12–15 sessions on a single charge. Actual performance varies based on temperature setting (higher temperatures draw more power), session length, and battery age. Devices with replaceable 18650 cells let you carry a spare battery and effectively give you unlimited sessions on the go — a practical advantage for frequent users.
How often should I clean my dry herb vape?
Use the included cleaning brush to sweep out the chamber after every session while it’s still warm — this takes about 30 seconds and prevents residue from hardening. Do a full deep clean with isopropyl alcohol (90%+) on removable components every 5–10 sessions, or whenever you notice flavour quality starting to drop. Regular cleaning is the most impactful single habit for maintaining consistent vapour quality and extending the life of your device.
Can I use any dry herbs in a dry herb vape?
Dry herb vaporizers work with a wide range of dried plant materials. Popular legal options in the UK include lavender, chamomile, peppermint, rosemary, and CBD hemp flower (which must contain less than 0.2% THC to be legally sold in the UK). The herb should be properly dried — damp or fresh material produces steam rather than vapour, reduces efficiency, and can leave moisture residue inside the device. Always ensure the herb you’re using is legal in your region and appropriate for inhalation use.
Why is my dry herb vape producing thin or no vapour?
Thin vapour typically comes from one of three causes: temperature set too low, chamber packed too loosely, or draw speed too fast. Try increasing your temperature by 10°C, ensuring the herb is evenly tamped in the chamber, and consciously slowing your draw to a steady 3–5 seconds. If vapour quality has declined over multiple sessions since you last cleaned the device, a full cleaning is almost certainly the fix — residue build-up is the leading cause of gradual performance degradation in dry herb vapes.
Your Next Steps: Building a Better Dry Herb Vaping Routine
Dry herb vaping rewards a small investment of technique with sessions that are consistently smoother, more flavourful, and more efficient than most first-time users expect. The fundamentals are quick to learn, and the details — grind consistency, temperature stepping, draw speed, regular cleaning — compound into sessions that get noticeably better within the first week.
Here is a practical sequence for your first week with a dry herb vape:
- Day 1: Charge fully, run your first session at 180°C to establish a baseline, and note how the vapour feels at that setting.
- Days 2–3: Try one session at 170°C and one at 195°C. Notice how flavour and vapour density change at each extreme.
- Days 4–5: Practise temperature stepping in a single session — open at 170°C, move to 185°C after three draws, finish at 200°C.
- Day 6–7: Do your first proper deep clean with isopropyl alcohol. Notice the difference in flavour quality in the very next session.
- Week 2 onwards: You’ll have settled on a preferred temperature range. Build a consistent cleaning routine and experiment with different dry herbs to see how the device responds to different materials.
VapeShopsUK.com is a trusted UK vape directory where you can compare dry herb vaporizers across brands, read verified user reviews, and locate stockists for devices and accessories. Whether you are choosing your first device or upgrading to a 2026 model with smart temperature control, understanding exactly how to use it from the start is what turns a good purchase into a consistently great experience.
—
Leave a Reply